How to Beat The Twins: Kill Order, Cursed Flame Dodging & Full Drop Guide
The hardest Mechanical Boss fight — kill order decides everything

Boss Overview
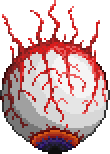
The most positioning-intensive Mechanical Boss. Two independent eyes, each with their own HP pool, each transforming at 40% HP. Retinazer (red eye) fires lasers at range — 20,000 HP. Spazmatism (green eye) charges and breathes Cursed Inferno — 23,000 HP. Phase 2 Cursed Flames can't be extinguished by water. Beat them for Souls of Sight (25-40) and Hallowed Bars (15-30).
One rule: focus 100% DPS on Spazmatism. Splitting damage so both transform simultaneously is a death sentence.
How to Summon
Two ways to summon The Twins:

Arena Setup

Multi-Layer Platforms (3-4)
200+ blocks wide, 15-20 blocks between layers — horizontal length is for kiting Spazmatism

Campfires (every 40 blocks)
Place on every layer for full regen coverage across your runway

Heart Lanterns
Stacks with Campfire regen. Hang them below platforms

3×3 Solid Block Shelters
Every 30-40 blocks, 5-8 blocks above platform — Retinazer Phase 2 lifesaver
Kill Order
Kill Spazmatism (green eye) first. Every time. This isn't preference — it's survival.
Core Reasons
- Spazmatism Phase 2 Cursed Inferno has aggressive tracking, deals heavy DoT, and cannot be extinguished by water. Getting hit is a death spiral.
- Spazmatism Phase 2 charges are faster and wider than Retinazer's attacks. Movement pressure is far higher.
- Both eyes in Phase 2 simultaneously is a wipe. Focus one down first or you won't survive.
Tactical Advantages
- Retinazer Phase 2 lasers are fully blocked by solid blocks — hide behind a 3×3 shelter and take zero damage.
- Solo Retinazer is manageable with vertical movement alone. Much less stressful.
Spazmatism Guide
SpazmatismP1
Phase 1 (HP 100% - 40%): Fires weakly tracking green Cursed Fireballs (25 damage), contact damage 50. Easy to dodge with horizontal movement. This is your DPS window — dump everything into Spazmatism before it transforms.
P2 — 40% HP
Phase 2 (HP < 40%): Defense jumps from 10 to 28, contact damage hits 75. Breathes tracking Cursed Inferno (40 damage) and charges aggressively. This is the deadliest phase — Cursed Inferno DoT cannot be extinguished by water.
Two core moves: horizontal kiting outpaces charges, vertical breaks cause flame spray to miss. Fly up with wings when it breathes — vertical tracking is weak. Shield of Cthulhu dash is your emergency button.
Retinazer Guide
RetinazerP1
Phase 1 (HP 100% - 40%): Fires purple lasers (25 damage), tries to stay diagonally above you. Low threat. Standard circular movement handles it. Keep your fire on Spazmatism.
P2 — 40% HP
Phase 2 (HP < 40%): Transforms into a laser turret. Defense goes from 10 to 20. Main laser deals 35 damage, rapid lasers deal 25 damage. Fires extremely fast. But lasers have a critical weakness — they cannot penetrate solid blocks.
Shelter tactic: Build 3×3 solid block shelters every 30-40 blocks in your arena. When Retinazer fires, hide behind them — zero damage. Pop out during the 2-3 second pause to deal damage. Beginners can beat Phase 2 Retinazer with this alone.
Berserk Mechanic
Either eye transforms when it drops below 40% HP. Defense and attack patterns upgrade completely. Both eyes in Phase 2 doubles the pressure — rapid lasers + Cursed Inferno + aggressive charges all at once.
Never split damage evenly. 100% DPS on Spazmatism until it dies. If both accidentally transform, still prioritize killing Spazmatism. Use shelters for laser protection while you finish it off.
Laser Dodge Guide
Retinazer Phase 2 rapid lasers are the biggest frustration for new players. Core logic: laser tracking has a delay. Vertical movement causes misses.
Class Strategies
Spazmatism P1 (HP > 40%)
Fires tracking fireballs (25 damage) + straight-line charges (50 contact damage). Fireballs are slow with weak homing. Easy to dodge while moving.
- Maintain horizontal movement — charges miss behind you
- Fireballs have weak tracking; moving dodges them passively
- This is your DPS window — burn Spazmatism down before 40%
Spazmatism P2 (HP < 40%) — DEADLIEST
Defense jumps 10→28, contact damage 75. Breathes tracking Cursed Inferno (40 damage). Charges are faster and wider. Cursed Inferno DoT cannot be extinguished by water.
- Horizontal kiting: run along platforms to outpace charges
- Vertical break: fly up with wings when it breathes — vertical tracking is weak
- Shield of Cthulhu dash is your emergency escape
Retinazer P1 (HP > 40%)
Fires purple lasers (25 damage) from diagonal above. Low threat. Standard circular movement handles it.
- Keep all DPS on Spazmatism — ignore Retinazer
- Lasers are predictive; staying in motion is enough
- Circular orbiting is sufficient
Retinazer P2 (HP < 40%)
Transforms into turret mode. Defense 10→20. Main laser 35 damage, rapid laser 25 damage. Fires extremely fast. But lasers CANNOT penetrate solid blocks.
- Shelters = zero damage — 3×3 solid blocks save your life
- Z-pattern vertical movement disrupts laser prediction
- Pop out during 2-3 second ceasefire windows to deal damage
Both Eyes Phase 2 — WIPE
Both eyes transformed = rapid lasers + Cursed Inferno + aggressive charges simultaneously. This happens when you split damage evenly. Worst case scenario.
- This is why you focus Spazmatism first
- If it happens, still prioritize killing Spazmatism
- Use shelters for laser protection while finishing Spazmatism
Ranger
Ranged
 Megashark + Crystal Bullets / Daedalus Stormbow + Holy Arrows
 Titanium Armor (Ranged helmet)
- Megashark + Crystal Bullets for focused Spazmatism DPS — crystal shards are reliable single-target
- Run horizontally along platforms — Spazmatism charges in straight lines and can't catch up
- Switch to Daedalus Stormbow for easy Retinazer cleanup after Spazmatism dies
- Easiest class — consistent DPS with great kiting distance
Melee
Melee Shadowflame Knife / Fetid Baghnakhs (burst)Titanium Armor (Melee helmet)
- Throw Shadowflame Knives while running — projectiles auto-track and bounce
- Fetid Baghnakhs for massive burst when Spazmatism gets close (risky but devastating)
- Ice Sickle projectiles linger and double-hit when both eyes overlap
- Moderate difficulty — requires tighter positioning than Ranged
Mage
Magic
 Golden Shower + Sky Fracture / Meteor StaffTitanium Armor (Magic helmet)
- Open with Golden Shower for Ichor (-20 defense) — The Twins are NOT immune to this
- Follow up with Sky Fracture for high crit burst damage
- Meteor Staff is most efficient when both eyes are close together
- Moderate difficulty — Ichor debuff is massive but mana management matters
Summoner
Summoner
 Sanguine Staff / Blade Staff + Cool Whip
 Spider Armor
- Max Sanguine Bats — perfect tracking AI lets you focus entirely on dodging
- Blade Staff ignores defense and shreds, amazing with Ichor debuff
- Dedicate 100% attention to dodging Spazmatism charges and flames
- Hard — longest fight duration, demands consistent dodging
Drops & Rewards
Two tiers: guaranteed drops every kill, plus Expert/Master exclusives. Here's what's worth your time:

Twins-exclusive drop. Crafts Optic Staff (summoner), Magical Harp, Rainbow Rod. 25-40 per kill is generous — 1-2 fights covers your needs.

Core material for Hallowed Armor and Avenger Emblem. Combined with Destroyer bars, should be enough for a full set. Expert gives 5 extra.

Wall decoration. 10% isn't bad — you'll get it within a few kills.

Vanity headpiece. Each has its own independent drop chance. Collector's item.
Expert mode guaranteed. Contains Hallowed Bars, Souls of Sight, and a chance at Mechanical Wheel Piece.
One of three parts for the Mechanical Minecart. Need one from each Mechanical Boss. 25% means multiple kills may be needed.
Master mode display item. Trophy for your house.
Master mode pet — a mini pair of Twins follows you around. 25% drop rate, may need a few tries.
Expert/Master drops an additional 5 bars (20-35 total), helping you gear up faster.
Recommended Gear
Recommended loadout for surviving Spazmatism Phase 2:
Tips & Tricks
Key things to remember for The Twins: