Lunar Events Complete Guide
Solar, Vortex, Nebula & Stardust Pillars — Fragments & Moon Lord Preparation
Events Overview
The Lunar Events are triggered immediately after defeating the Lunatic Cultist at the Dungeon entrance. Four Celestial Pillars spawn across the world, each representing a different class and surrounded by unique enemies. This is the final event before the Moon Lord — the ultimate boss of Terraria.
Each pillar drops fragments used to craft the most powerful weapons and armor in the game. The fragment weapons are essential for the Moon Lord fight, and the Luminite dropped by Moon Lord is used to craft endgame armor sets. Mastering the Lunar Events is the key to completing Terraria.
Each pillar is protected by a celestial shield that makes it invulnerable. You must defeat 150 of the pillar's surrounding enemies to break the shield, after which you can damage and destroy the pillar itself. Defeated enemies count toward the shield counter shown at the bottom of the screen.
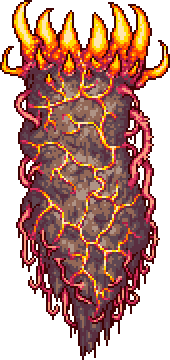
Solar Pillar
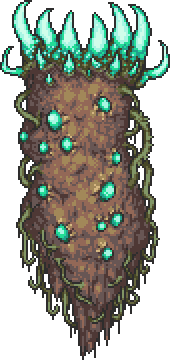
Vortex Pillar
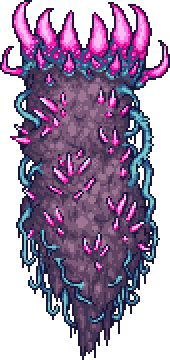
Nebula Pillar
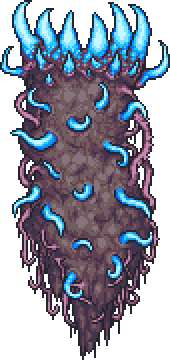
Stardust Pillar
Solar Pillar
The Solar Pillar is associated with the melee class and is widely considered the MOST DANGEROUS pillar. Its area is dominated by Crawltipedes — massive worm enemies that exclusively target players who are airborne. The key strategy is to stay grounded at all times.
Stay on the ground — this cannot be overstated. Crawltipedes will instantly kill you if you fly. Use melee weapons or homing projectiles. Build a flat platform to fight on and never jump higher than a few blocks.

Selenian
Can reflect projectiles back at you when spinning. Use melee or time your shots carefully.
Corite
Charges at high speed. Deals heavy contact damage. Keep moving laterally to dodge.
Crawltipede
MOST DANGEROUS — only targets airborne players. Stay on the ground at all times. Only the tail segment takes damage.
Drakomire
Ground-based enemy that breathes fire. Less threatening if you keep your distance.Vortex Pillar
The Vortex Pillar is associated with the ranged class. It features medium-difficulty enemies and a unique stealth mechanic for some enemies. Stay mobile and maintain distance from enemies — a solid ranged weapon makes this pillar manageable.
Keep a medium distance and use piercing ranged weapons. Focus on Alien Queens first to prevent Larvae swarms. Wings and good mobility accessories are safe to use here — no Crawltipede equivalent exists.

Storm Diver
Flies and shoots rapid-fire projectiles. High damage output but relatively fragile.
Alien Queen
Spawns Alien Larvae that home in on you. Prioritize killing the Queen to stop the spawns.
Alien Hornet
Standard flying enemy. Fires stingers. Less dangerous than other Vortex enemies.Nebula Pillar
The Nebula Pillar is associated with the magic class. It features enemies with homing projectiles and teleportation abilities. Brain Sucklers can latch onto your head and obscure your vision, making this pillar disorienting if you are not prepared.
Watch for Brain Sucklers attaching to you — swing your weapon constantly to knock them off. Keep moving erratically to avoid Predictor shots. Magic weapons with area damage work well here.

Brain Suckler
Latches onto your head, blocking vision and dealing damage over time. Attack immediately to remove it.
Nebula Floater
Teleports and fires homing lasers. Keep moving to avoid the projectiles.
Predictor
Fires predictive projectiles that aim where you will be. Change direction frequently to dodge.Stardust Pillar
The Stardust Pillar is associated with the summoner class and is generally considered the EASIEST pillar. Its enemies are less aggressive, though Star Cells can multiply if not killed quickly. The area is relatively calm compared to other pillars.
Focus on killing Star Cells completely before they regenerate. This is the safest pillar to use flight and aerial combat. Summoner weapons can handle the enemies while you focus on dodging.

Star Cell
Splits into smaller cells when damaged. Kill the small cells quickly or they will grow back into full-size Star Cells.
Flow Invader
Teleports and fires projectiles. Moderate threat level.
Milkyway Weaver
Large worm enemy that moves through blocks. Less dangerous than Crawltipede — does not specifically target airborne players.Fragments & Crafting
Each pillar drops 12-60 fragments of its type upon destruction. These fragments are used at an Ancient Manipulator (dropped by the Lunatic Cultist) to craft powerful class-specific weapons and armor. You can also combine 15 of one fragment type with 5 of each other type to craft different fragment items.

Solar Fragment

Vortex Fragment

Nebula Fragment

Stardust Fragment
Moon Lord Preparation
After all four pillars are destroyed, the Moon Lord spawns after a 1-minute countdown. This is the final boss of Terraria and requires thorough preparation. If you die or leave the world, you must re-defeat the Lunatic Cultist to trigger the event again.
Set up a Nurse teleport station — place the Nurse in a sealed room near your arena with a bed for quick healing via the housing menu.
Build an arena with Heart Lanterns, Campfires, Star in a Bottle, Honey pools, and Heart Statues wired to timers for constant regeneration.
Use maximum buff potions: Ironskin, Regeneration, Endurance, Lifeforce, Wrath/Rage, Swiftness, and a Flask for your class.
Equip the best class-specific gear from the Lunar fragments. Solar Eruption and Nebula Arcanum are particularly effective against Moon Lord.
Carry a Rod of Discord for emergency teleportation to dodge Moon Lord's Phantasmal Deathray — his most dangerous attack.
Consider using the Cosmic Car Key (UFO mount) for unlimited flight, or Fishron Wings for high speed and acceleration.
Tips & Strategies
Tackle the Solar Pillar last if possible — it is by far the most dangerous. Start with Stardust (easiest) to warm up.
You can teleport home between pillars to heal and restock. The pillars do not despawn or regenerate their shields.
Crawltipedes at the Solar Pillar only target players above the ground — stay grounded and use weapons that do not require jumping.
The shield kill counter is shared between all players on a server — coordinate with teammates in multiplayer.
Craft your class weapons immediately after the pillars fall. You have only 1 minute before Moon Lord arrives.
If you are not ready for Moon Lord, you can leave the world during the countdown to cancel the spawn and re-prepare.